Musician’s Ear Plugs Comparison Study
Can sound be attenuated and the fidelity preserved using musician’s ear plugs?
As the population ages, hearing damage has moved to the forefront of public consciousness. Many older folks are realizing (often too late) that they had some bad listening habits in their youth. It is a personal responsibility to protect oneself from the sound levels you may be exposed to in entertainment venues, concerts, bars, and many recreational activities. I initiated a thread on the SynAudCon Forum a few weeks back regarding hearing protection preferences. Thanks to all who replied. I decided to follow it with some investigation and testing of my own.
There is no shortage of hear protection ear devices in the marketplace. Many are like nutritional supplements. They are marketed by adjectives and testimonials rather than measured data. There are some good reasons, including
1. Measuring ear buds is not easy.
2. The measured results are not pretty.
3. The public is not likely interested or able to interpret the results.
Human Head Simulation
Human hearing is complicated. The ear/brain system is a two-channel real-time processor driven by intelligence. Also, no two ear/brain systems are alike. I know what I hear, but I cannot know what you hear.
When testing ear bud hearing protectors there are two things we would like to do:
1. Quantify the signal that arrives at the ear drum.
2. Quantify how it is processed by the ear/brain system.
This study takes a stab at item one, which is by far the simpler of the two. Even so, there are many caveats regarding measuring what gets past the ear plug. For testing, a microphone stands in for the ear drum.
Commercial human ear simulator test jigs are both amazing and expensive. I have a budget unit that simulates the outer ear (pinna) and the ear canal (Figure 1). The ear canal is not human-like. It is a simple tube. The pinnae are sort of human-like but represent only one of an infinite number of shapes. I’ll say up front that anyone testing ear plugs and headphones in a serious way should familiarize themselves with the standards and purchase an appropriate test rig.

Figure 1 – (Left) The MiniDSP EARS test jig. It’s less than 300USD. (Right) The GRAS 43 ear simulator. The price (and exact model number) depend on the configuration, but it is at least two digits times 103.
“More Expensive” Isn’t Necessarily the Answer
Expensive ear simulators share some of the shortcomings of the EARS unit. All pinna shapes and ear canal sizes cannot be considered. I’ve compared the EARS rig to expensive simulators when headphone testing, and as expected found that the response is different. But so is the response of two expensive simulators of different make and model. Standards exist but are themselves controversial and not universally accepted.
As complex as human hearing is, an ear plug hearing protector is essentially blocking sound from propagating through a tube to energize the ear drum. I decided to simplify the project to just that and fabricate a test jig (Figure 2) that removes some of the variables. Relative data from a simplified test jig is better than no data at all. Also, there are some things learned by going through the process.

Figure 2 – Side view of my simple test jig.
Ear Canal Resonance
The human ear physiology has a built-in amplifier for the speech consonant frequency range in the form of an ear canal resonance (ECR). The ECR is produced by a small tube that feeds the eardrum (Figure 2). Of interest are the tuning frequency, bandwidth, and gain of the resonance. The details vary per person (and per ear on the same person) but in general it is a response peak in the 2 kHz – 5 kHz frequency range. The level is 10 – 30 dB, and the bandwidth is about one octave. This produces a peak in the ear system’s frequency response, and some extra amplification for speech consonants.
Any object placed in the ear canal disrupts the ear canal resonance, destroying the gain that it provides. This is good for fidelity but bad for communication.
My Test Jig
My test room has a removable wall panel used for in-boundary loudspeaker testing. I cut a blank panel and drilled a hole for an omni measurement microphone with an ear drum-sized diaphragm (Figure 3). A glue block on the back of the panel provides the needed depth. The fit is tight, and the microphone insertion depth determines the tuning frequency of the canal resonance. I flared the exposed end of the hole slightly to provide more surface area for the ear bud to contact. Multiple coats of polyurethane and some polishing produced a very smooth surface. Unlike an actual ear simulator, my rig allows visual confirmation that the plug is properly seated. If the plug is too small the fit is too loose there is a visible gap. If it is too large the flange can buckle, also creating a gap. Both conditions dramatically affect the measured results. The moistened plug can be slowly rotated between thumb and forefinger to seat it properly. I tested the ear bud line-up on three consecutive days to validate repeatability.

Figure 3 – Infinite boundary test jig (Foamie ear plug in place).
The simple test jig provides a level playing field for comparing the response of round ear plugs. It is not possible to test custom molded plugs on this rig, and none were considered in this study. I suspect that the main advantage of a molded plug is comfort, not performance. It should also be pointed out that a triple flange ear plug will likely seal better in a human ear canal than in a straight tube.
Reference Measurements
A series of measurements were made to evaluate the test rig (Figure 4). First, the loudspeaker + microphone combination were measured (free-field anechoic – Curve A). Next, the microphone was inserted into the rig, flush with the boundary (Curve B). The expected 6 dB of boundary gain is present. Next, the microphone was recessed 2 cm to simulate an ear canal (Curve C). The expected resonant peak is present. Lastly the free-field measurement (Curve A) was subtracted from Curve C, leaving the boundary response (Curve D).
Different choices for the microphone diaphragm diameter and tube length will change the resonance frequency and Q and change the measured results. This is one reason why your measurements will be different than someone else’s.

Figure 4 – Measurements made to quantify the performance of my test jig. The measurements and curve mathematics were done with REW.
Ear Plug Types
Protection ear plugs are brute force. They are typically foam and produce a lot of attenuation (>40 dB). They are used in factories and for loud recreational activities (e.g. shooting) and they severely impair face-to-face communication. I included one such plug (the “Foamie”) in this line-up, for comparison.
Musician’s ear plugs produce less attenuation (15-20 dB) and are designed to preserve the fidelity of the sound being heard by the wearer. They are usually marketed as “high fidelity” ear plugs for concert goers, DJs, musicians, etc. Essentially, they have less attenuation and sound better than protection plugs. Musician’s ear plugs are usually silicone and have 1 – 3 flanges that fill the ear canal (Figure 5).
Both generic and molded ear plugs can be active, utilizing internal circuitry to add noise cancellation to the process. These plug types require a different measurement technique and are not presented in this article.


Figure 5 – The ear plug line-up. The table shows the rated attenuation.
The Objective
I grabbed an assortment of low-priced “musician’s” ear plugs off of Amazon (20-50USD) (Figure 6).
We probably shouldn’t judge hearing protectors like we do loudspeakers. The human auditory system does not have a flat frequency response, and neither do most hearing protectors.
The little “foamie” ear plugs (Item A) do a superb job of reducing the sound level across the entire spectrum. The attenuation can be 40 dB or more. These are classified as protection devices with no intent to preserve fidelity. If you are operating a chain saw, this is your product.

Figure 6 – Ear plugs in original packaging.
A musician’s ear plug is intentionally designed with less attenuation. Fifteen to twenty dB is common. This reduces a rock concert level (105 dBA-Slow) to a more listenable (and less damaging) 85-90 dBA-Slow. This level reduction prevents the ear-brain system’s built in compression from kicking in, resulting in a more linear listening experience.
Why Ear Plugs Aren’t “Flat”
In addition to reduced attenuation, most musician’s plugs are designed to present a relatively flat frequency response to the ear drum over their useful operating range. There are two mechanisms at work.
1. The attenuation due to the presence of the plug.
2. The disruption of the ear canal resonance.
There are three ways to display the “response” of the plugs.
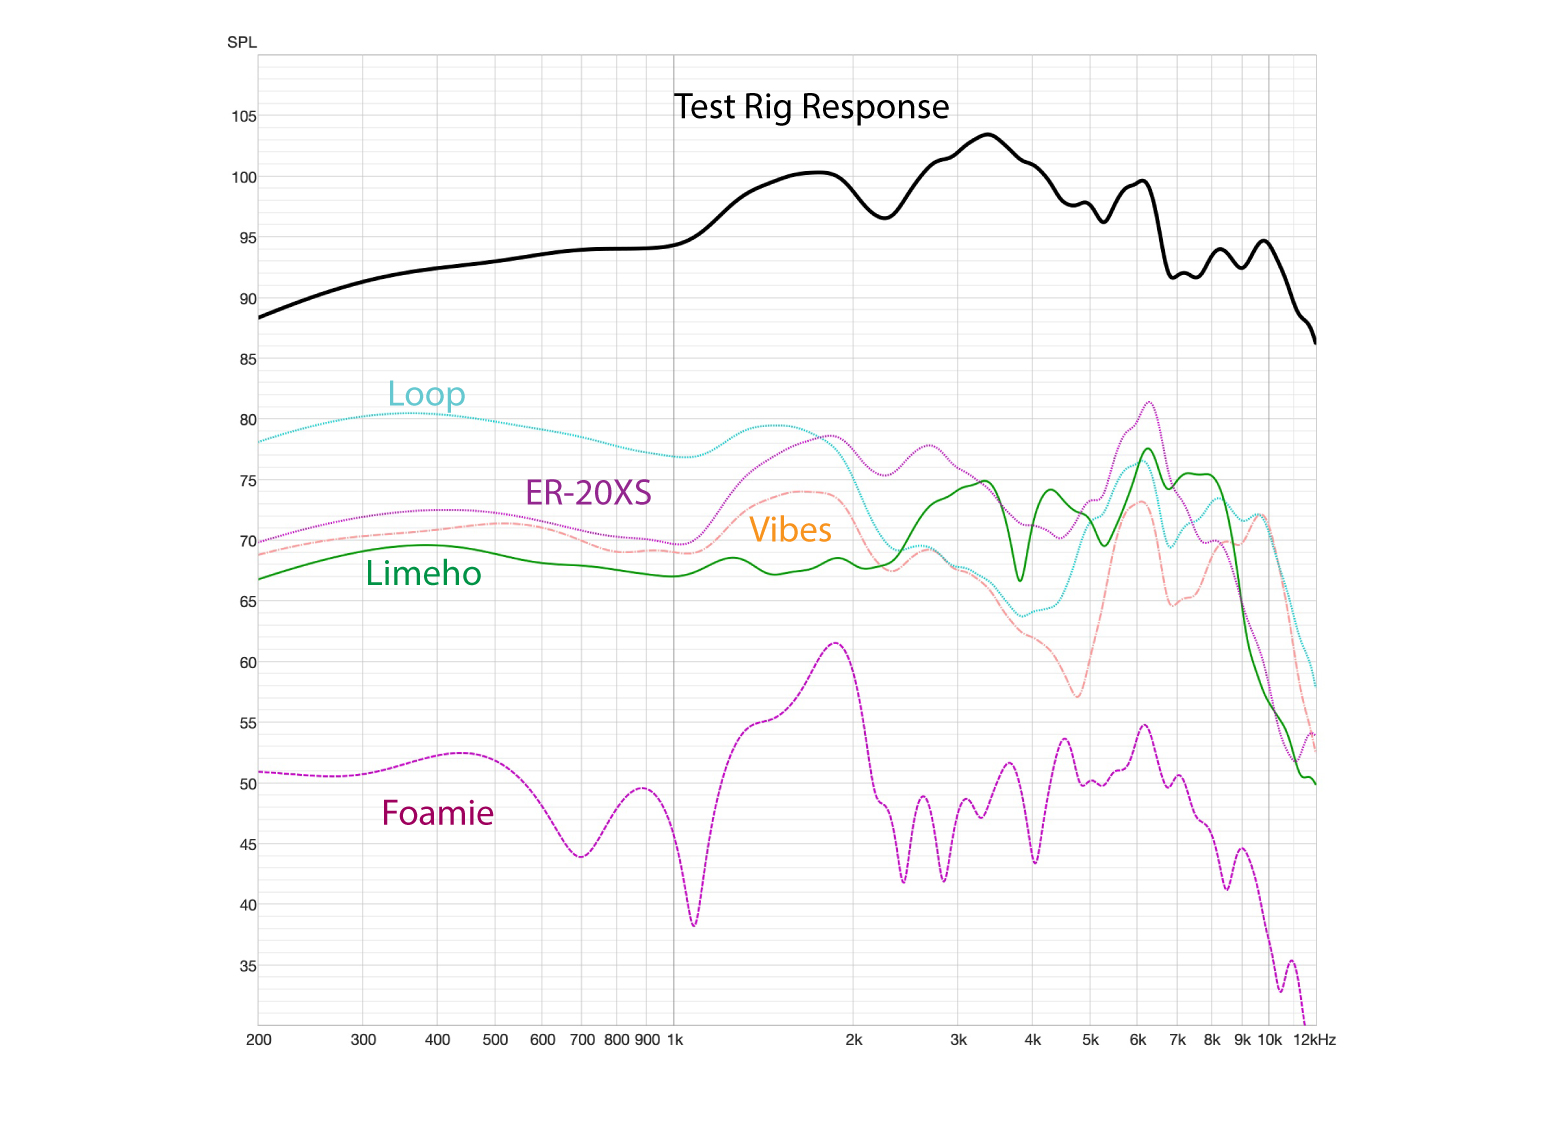
- As measured – Figure 7 shows the raw measurements of the test rig and plugs.
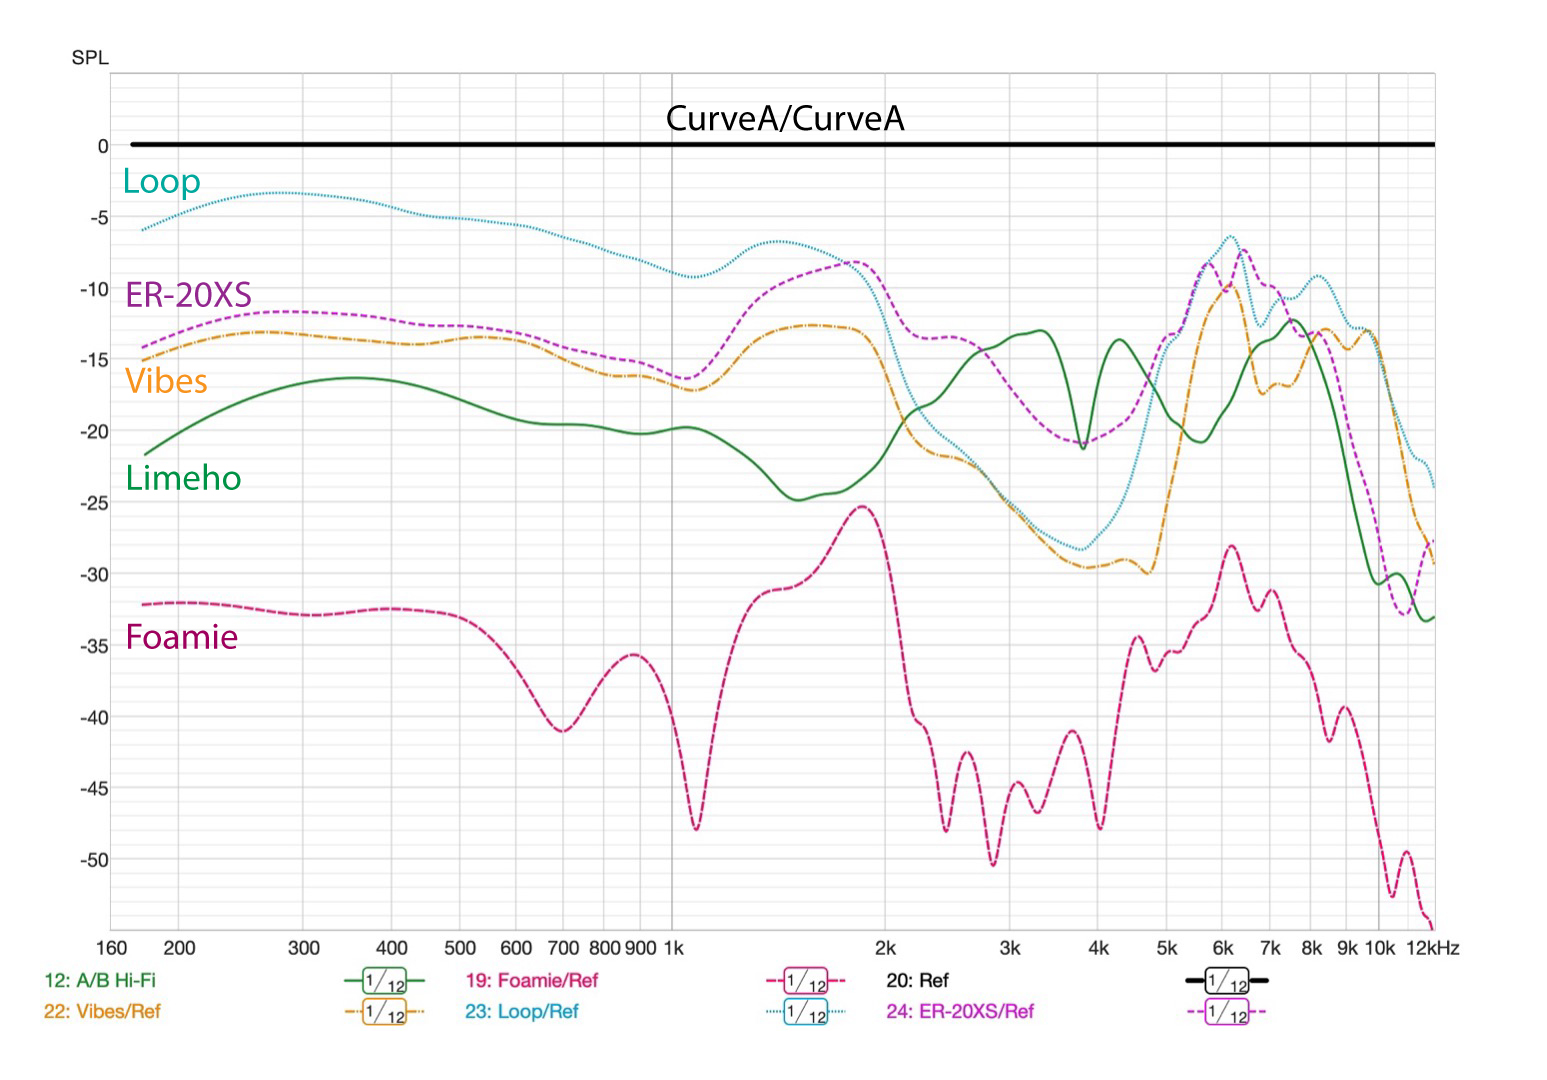
- The plug response compared to the free-field mic + loudspeaker response (Figure 8). Curve A/Curve A – This reference is the equalized free-field response. It excludes the response of the boundary and ECR.
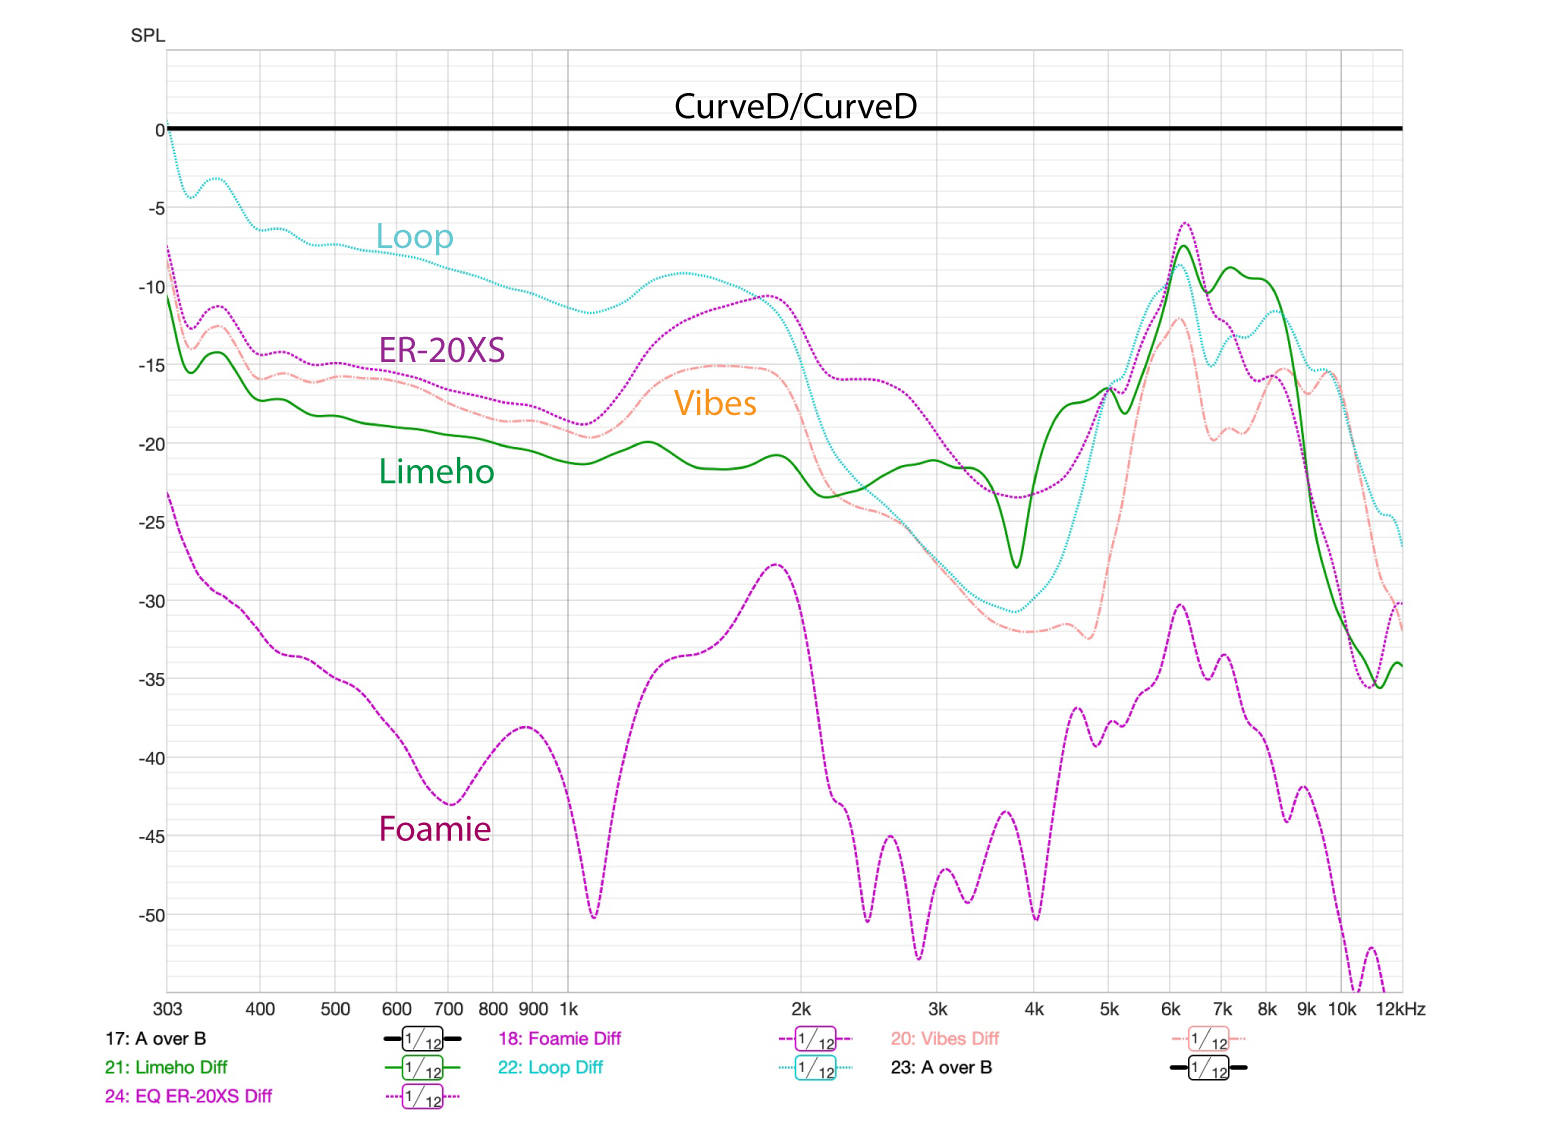
- The plug compared to the equalized test jig response (Figure 9). Curve D/Curve D – This reference is the boundary response. It excludes the response of the microphone and loudspeaker.
The measured ear plug responses are best considered by comparing them with the reference responses.
 Figure 7 – The “as-measured” response curves of the ear plugs. The vertical axis (SPL) is absolute. These data include the response of the test rig.

Figure 8 – These curves were produced by comparing the plug’s response with the equalized free-field microphone+loudspeaker response. The effect of the boundary and mic+loudspeaker response is excluded. The vertical axis is in relative dB.

Figure 9 – These curves were produced by comparing the plug’s response with Curve D from Figure 4. The destruction of the ECR adds to the attenuation of the plug. The vertical axis is in relative dB. The raw response of the mic+loudspeaker is excluded.
The Fit is EVERYTHING!
A good seal is required when the bud is inserted into the ear canal. Most buds come with multiple tips (e.g. small, medium, and large). Some buds must be ordered in a specific size. I highly recommend getting one that includes multiple tip sizes, because the fit affects both the level attenuation and the frequency response.
I rejected the Eargasm™ plugs because the attenuation mechanism is embedded into the third silicone flange. This was too large to fit into the tube opening. Multiple attempts at “fitting” the plug produced different results – a clue that the measurement is invalid. The other plug measurements produced repeatable results. This may be a great plug, but I was unable to test it.
Some Take-aways
1. The response of an in-ear hearing protector is exquisitely dependent on the fit. The fit should be a major factor driving the purchase decision.
2. The frequency response differences in Figures 8 and 9 equate to tonal differences to the listener. All of the plugs removed the ear canal resonance. This may be why they are described as “musical.”
3. All of the units tested showed broadband sound reduction typical of what a musician or concertgoer might need. They all “work” but they will sound different.
4. Choosing an ear bud is much like choosing a vocal mic. “Accuracy” is not necessarily an objective, nor is it even achievable.
5. No two human ears are exactly alike. The combined response of the ear and ear bud will be unique for each wearer.
6. Given the sensitivity of the ear buds to the proper fit, and the gross affect that they have on tonality, I would not recommend wearing any of these earbuds to mix, other than for making level changes.
Regarding accuracy, it’s better to operate the sound system at a safe listening level, than to “crank it up” and “bud it back” down.
Musician’s ear plugs are an essential tool for performers on stage, positioned next to drum kits and amplifiers. Even more so if they play every night.
Musician’s ear buds for the mix engineer and audience are a solution for a problem that should not exist. If the show is too loud for the front-of-house mix personnel, it’s too loud for the audience. Think of how much money could be saved by reducing the SPL of a sound system by 10-15 dB. pb
